The Filmpac Ad Challenge
We know you work hard at your craft, and we want to invite you (yes YOU) to show us what you've got in our 10-day Ad Challenge!
Continue Reading
By Kevin Graham
In my filmmaking career, I have very rarely ever used a gimbal of any kind. Sure, sometimes they’re necessary, but you would be amazed at what you can get away with with a simple handheld rig.
You can capture some pretty smooth shots with the right ergonomics, a steady hand, this secret post-production weapon:
This is my favorite feature of Adobe Premiere Pro (the Warp Stabilizer effect is also available in After Effects as a plugin). Basically, this effect can take a shaky, unusable clip and smooth it out significantly (with some limitations, of course). It’s a staple of my workflow. I use Warp Stabilizer on a huge amount of my video editing projects.
And it’s a fairly simple effect to use and master.
We won’t cover it here, but DaVinci Resolve also has its own built-in stabilization.
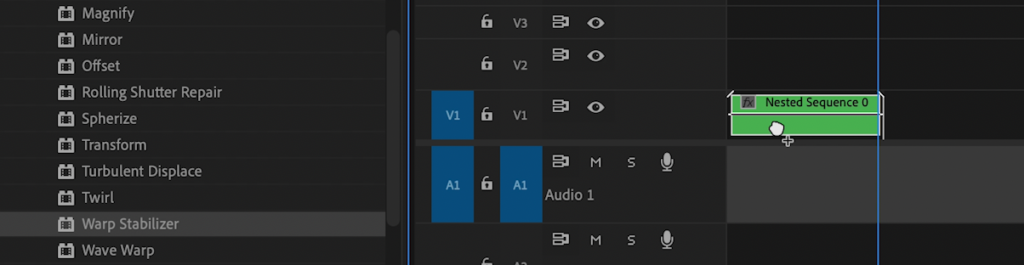
Let’s say you captured a video clip that you can’t replace in the edit, but it’s a bit too shaky.
You’d add Warp Stabilizer as an effect, and it will immediately do a frame-by-frame analysis of the shaky footage.
I always enable “detailed analysis” and “enhanced” rolling shutter reduction, but this is not usually necessary to fix shaky video.

After analysis, the clip is then stabilized at the default settings or presets, in the effects control panel. At 50% reduction, a shot will often look too smooth, so I’ll usually dial the smoothness control back to around 3 to 10%.
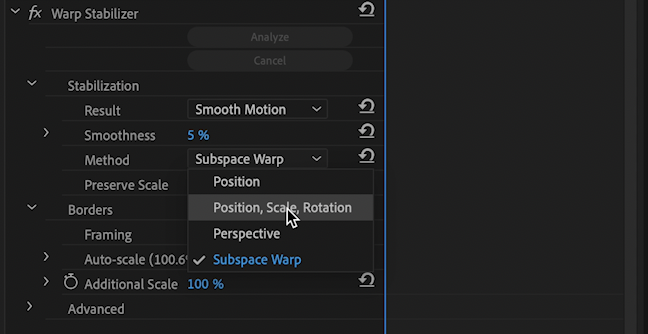
I’ve had some good luck with the default “subspace warp” method, but usually opt for “position, scale, and rotation”, which always seems to be a bit cleaner. You’ll also want to make sure “smooth motion” is selected, rather than “no motion”. This will emulate natural camera movement and crop less of your image.
After getting your settings customized, play your clip. You can then adjust if things still aren’t quite right.
Of course, there will be some clips beyond saving.
Particularly, slow-motion clips with flickering lights are tricky to stabilize. The motion will often distort the proportions of the clip. Panning shots can also sometimes be troublesome.
The same goes for clips with moving foreground, and clips that are, well, just too shaky.
It goes without saying that you should always try to film as smoothly as possible in the first place, but you will be surprised at how many shots Warp Stabilizer can save.
It is truly one of the most useful video effects available for video editors of any skill level.
Yes, you can stabilize a specific part of a video clip using Warp Stabilizer in Premiere Pro. First, isolate the section of the video you want to stabilize by using the Razor tool to cut the clip into segments. Then apply the Warp Stabilizer effect only to the segment you wish to stabilize. This approach is particularly useful when dealing with longer clips where only certain parts exhibit shaky footage, allowing you to maintain the natural motion in the rest of the clip.
The ‘Subspace Warp’ method in the Warp Stabilizer effect works by distorting various parts of the frame differently to achieve stabilization. This method is particularly effective for footage with complex motion or when other stabilization methods fail to produce satisfactory results. Unlike the ‘Position’, ‘Scale’, and ‘Rotation’ methods, which adjust the entire frame uniformly, ‘Subspace Warp’ can stabilize more effectively by adapting to different motion vectors within the same frame, thus preserving the video quality and reducing the jelly-like artifacts that can occur with other methods.
When adjusting Warp Stabilizer settings, it’s important to balance stabilization effectiveness with video quality. Start by choosing the appropriate stabilization method, with ‘Subspace Warp’ often providing the most comprehensive stabilization. If you notice warping or other artifacts, try lowering the ‘Smoothness’ percentage. Additionally, adjusting the ‘Cropping Less <-> Smoothing More’ slider can help you find a good balance between cropping the edges of the video and smoothing out motion. Always preview the results after making adjustments to ensure that the stabilized footage maintains the desired quality and aesthetic. For detailed fine-tuning, experiment with the Advanced settings, such as reducing the Rolling Shutter Ripple when dealing with CMOS sensor-related issues.
The ‘No Motion’ setting in Warp Stabilizer is designed for scenarios where you want to completely remove all motion from your video footage, effectively simulating a static, tripod-mounted shot. This setting is particularly useful for stabilizing footage that was intended to be a still shot but ended up with unwanted movement or shake.
When ‘No Motion’ is selected, Premiere Pro’s Warp Stabilizer performs an in-depth analysis of the video clip to identify all motion patterns. It then works to counteract these movements by applying inverse transformations to each frame. This includes adjusting the position, scale, and rotation of each frame to align them consistently throughout the clip. The result is a video that appears as if it was shot without any camera movement at all.
It’s important to note that using ‘No Motion’ may result in some cropping of the video frame, as the edges often need to be adjusted to compensate for the stabilization. This setting is best used for shots where maintaining the exact framing is not critical, or where there is enough room in the original shot to accommodate this cropping without losing important visual elements. Additionally, for shots with significant movement, ‘No Motion’ may introduce some artifacts or warping, so it’s recommended to preview the effect and adjust settings like ‘Smoothness’ and ‘Borders’ to achieve the desired stabilization while preserving video quality.
Handheld Footage in Dynamic Scenes
Imagine you’re shooting a documentary or a vlog using a handheld camera. Despite your best efforts to keep the camera steady, the footage turns out shaky, especially in dynamic scenes where you’re moving along with the subject. This is a common issue with handheld shots, as maintaining perfect stability is challenging, especially in fast-paced environments. Warp Stabilizer can be applied to this type of footage to smooth out the shakiness, giving it a more professional, steady look while still retaining the natural movement characteristic of handheld shooting.
Action and Sports Videography
Action scenes, like sports events or chase sequences in a film, often involve rapid and abrupt camera movements. These movements, while adding to the intensity of the scene, can also result in undesirable shaky video. Using Warp Stabilizer, you can stabilize these sequences, reducing the shake and making the footage more viewer-friendly. It’s especially useful in post-production when you realize that some of the crucial action shots are too shaky, but you can’t reshoot them.
Aerial and Drone Footage
Drone footage, although usually smooth, can sometimes be affected by wind or rapid drone movements, leading to shaky video. This is particularly evident in footage taken by consumer-grade drones that might not have highly advanced stabilization hardware. Applying Warp Stabilizer to drone footage can help iron out these shakes, ensuring that the aerial shots are smooth and stable, which is crucial for establishing shots or scenic landscapes.
Post-Production for Indie Films
Independent filmmakers often work with a limited budget and equipment, meaning they might not have access to high-end stabilization gear like sophisticated gimbals or Steadicams. In post-production, Warp Stabilizer can be a lifesaver for stabilizing key shots, especially if the film includes dynamic scenes like walking or running, where stabilizing equipment would typically be used. This can significantly improve the production value of the film without incurring extra costs.
Repairing Archival or Historical Footage
When working with archival or historical footage, you often encounter shaky and unstable video due to the limitations of the recording equipment used at the time. Warp Stabilizer can be instrumental in such scenarios to stabilize this old footage, making it more palatable for modern audiences. This is particularly valuable in documentary filmmaking or in remastering old films where the original stability of the footage cannot be physically improved.
Kevin Graham is the Music Director at Filmpac.
We know you work hard at your craft, and we want to invite you (yes YOU) to show us what you've got in our 10-day Ad Challenge!
Continue Reading
When it comes to professional video editing in the 2020s, two powerful software options stand out: Adobe Premiere Pro vs. DaVinci Resolve.
Continue Reading
As content creators, the computers we use to edit our videos are just as important as the cameras we use to film. Here are our favorites.
Continue Reading
By far, the two most common frame rates in modern American video editing and production are 24fps and 29.97fps. Here's the difference.
Continue Reading
Filmpac’s newly-designed Project Feature is a powerful tool for collaborative video editing. Here’s a quick rundown of how it works.
Continue Reading
One of the most difficult parts of being a professional filmmaker is effectively managing and budgeting your time.
Continue Reading
Want to make money selling footage through a major stock footage platform like Filmpac? This page will walk you through the processs.
Continue Reading